How to draw a Christmas tree in cells. How to draw a Christmas tree with a pencil step by step for children, cell by cell? How to draw a spruce with a pencil step by step? There are time limits for working with graphic dictations
Graphic dictation, drawing by cells
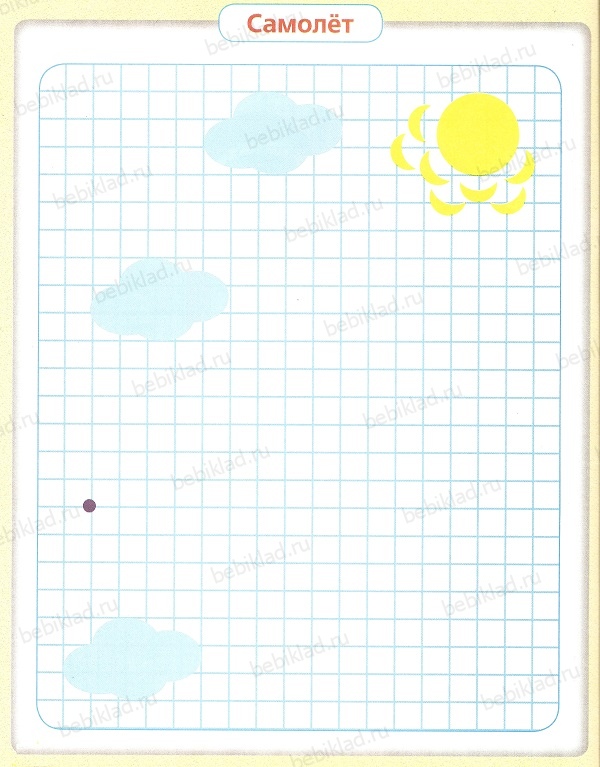
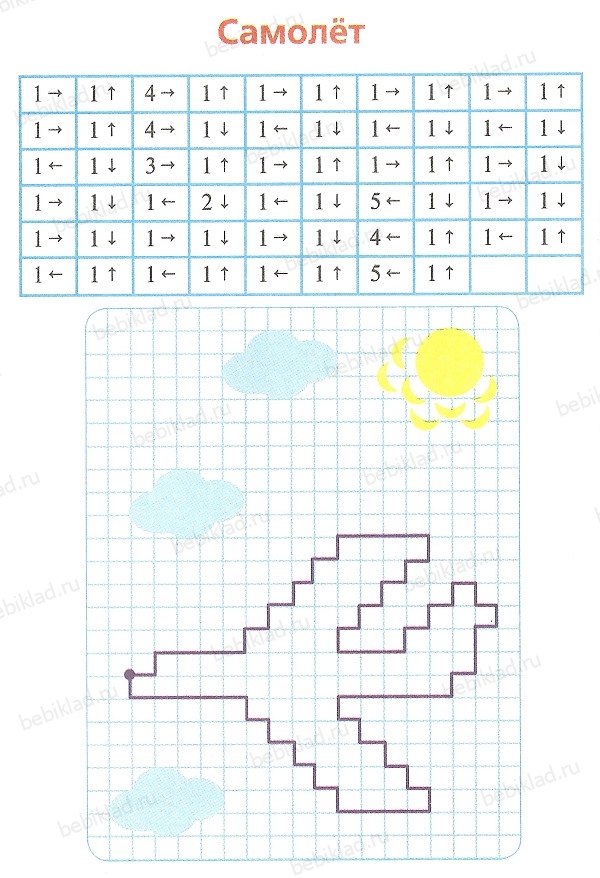
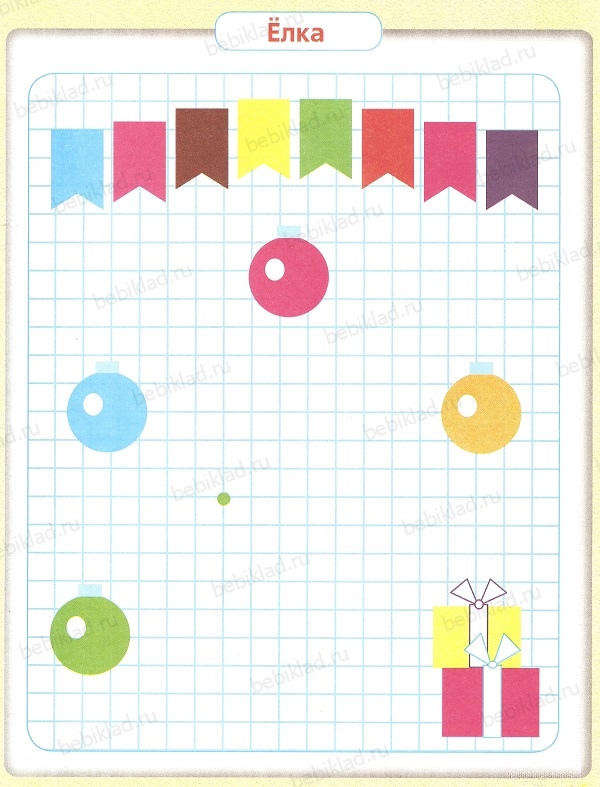
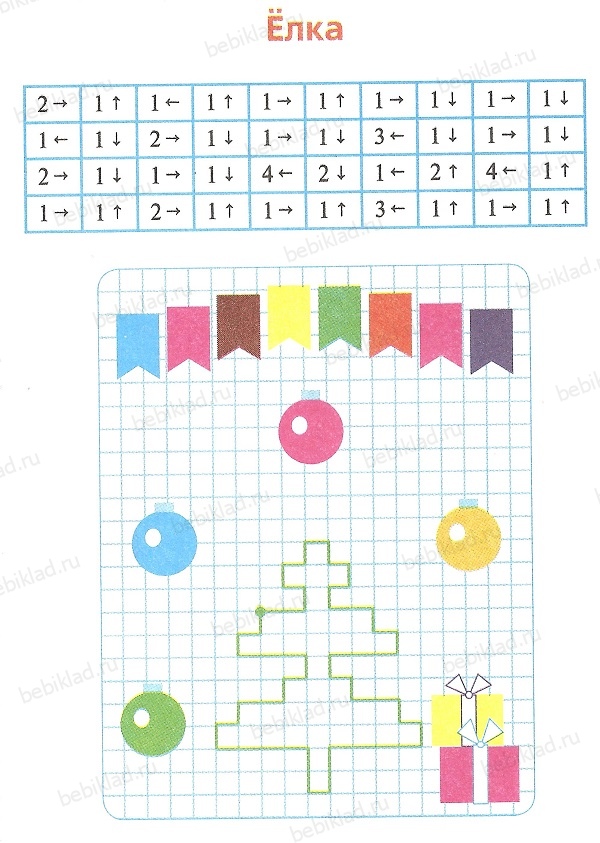
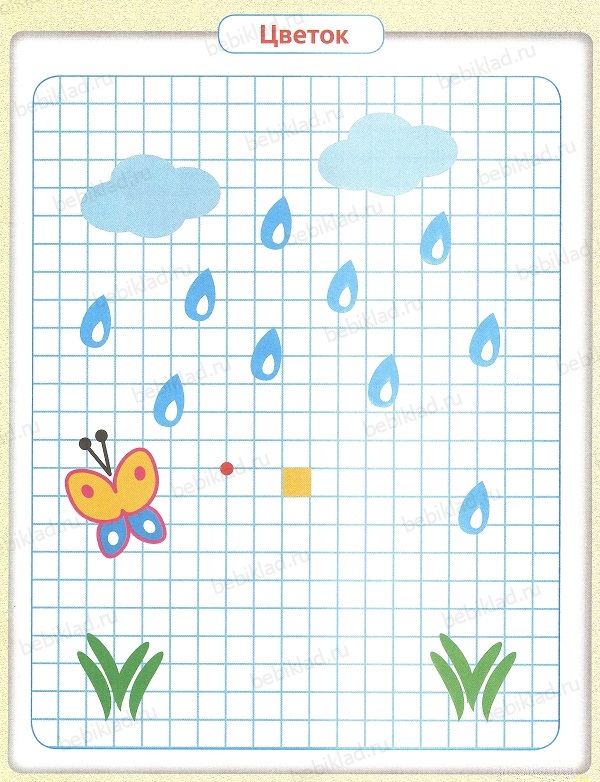
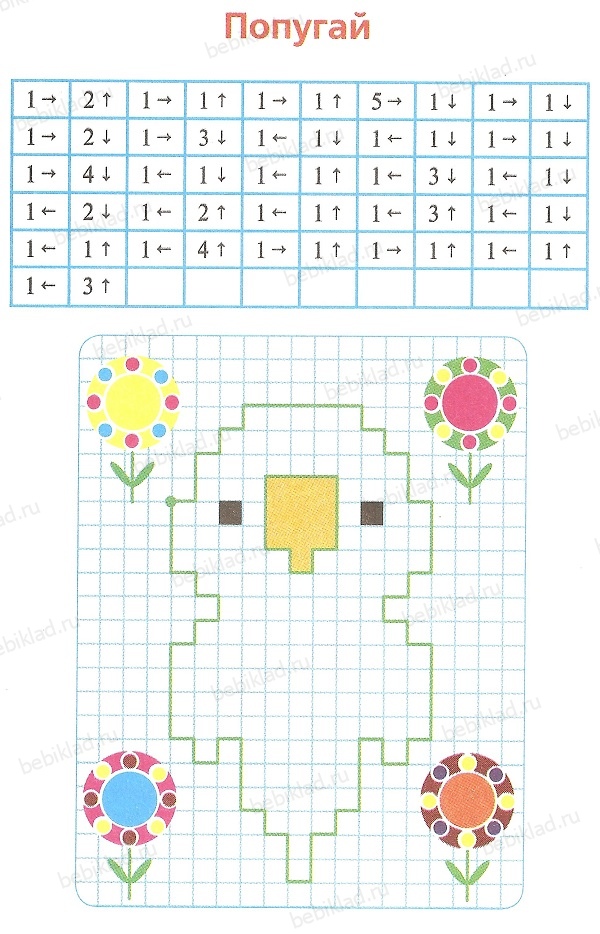
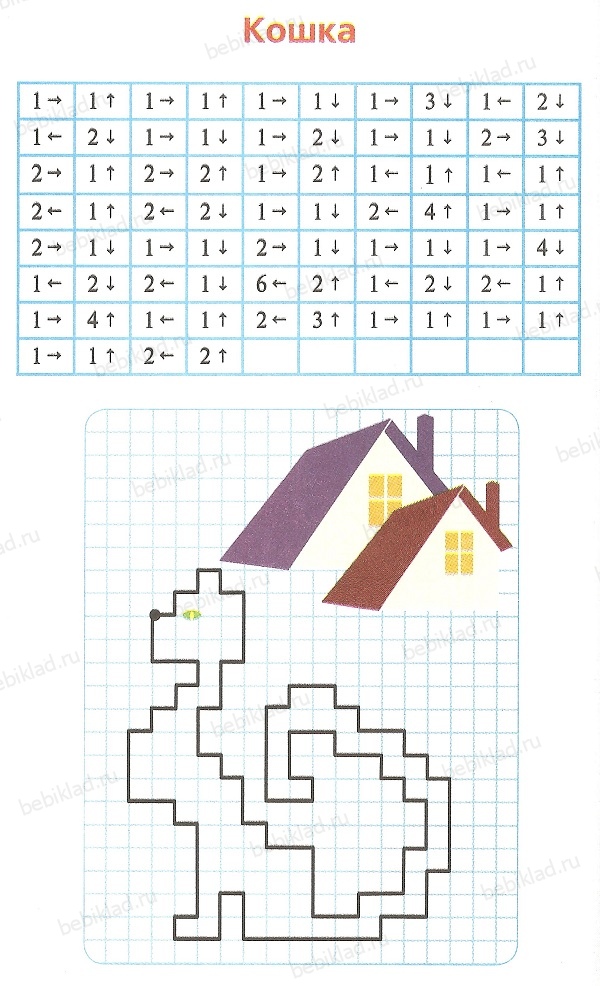
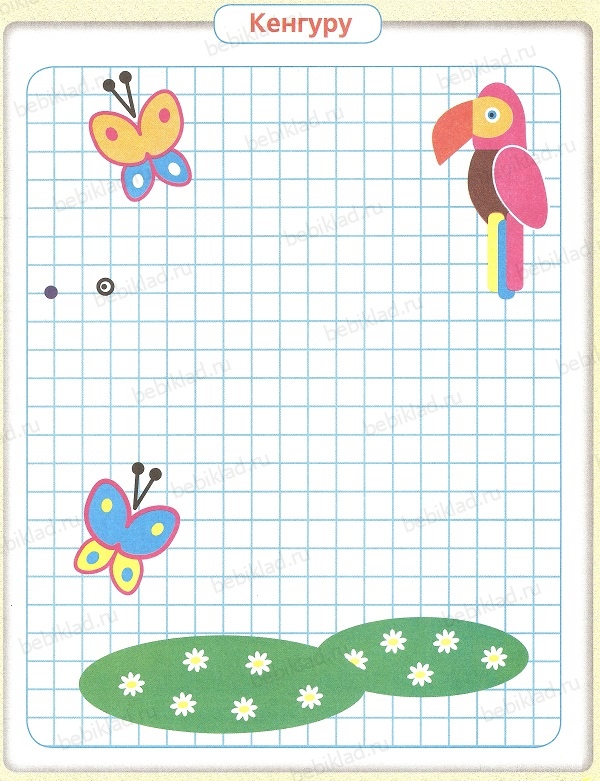
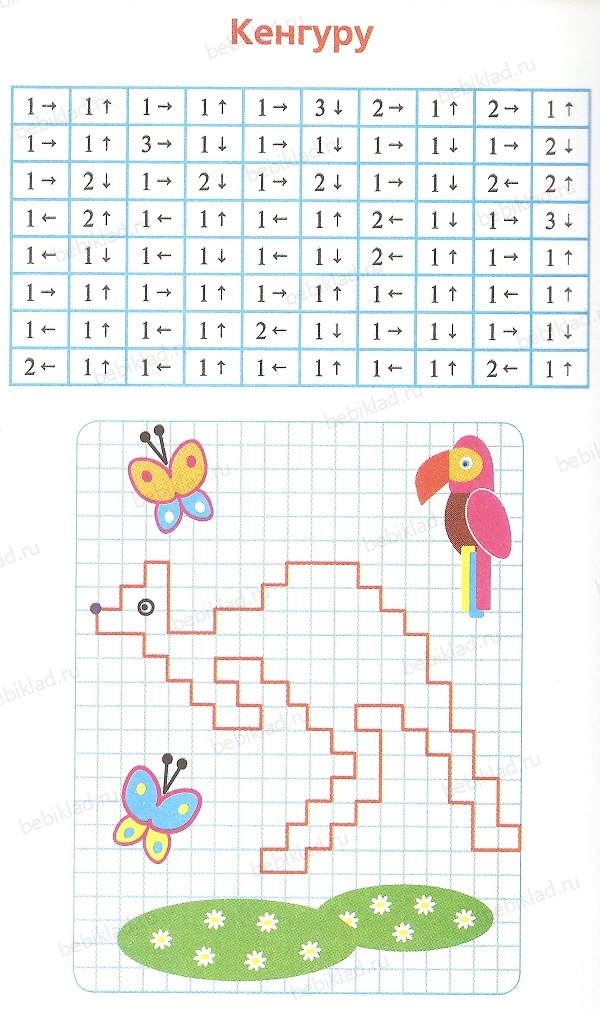
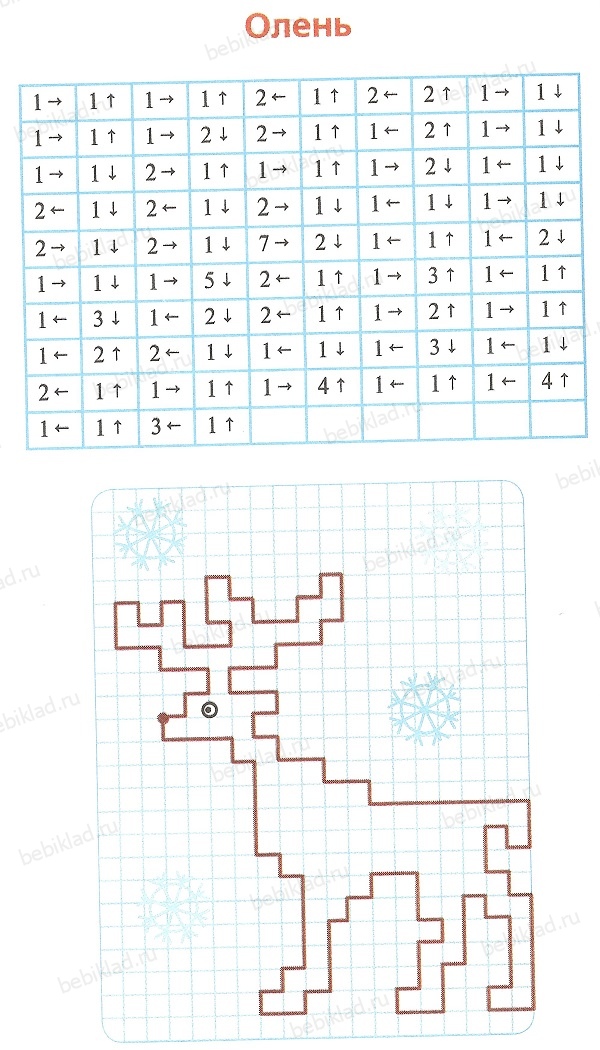
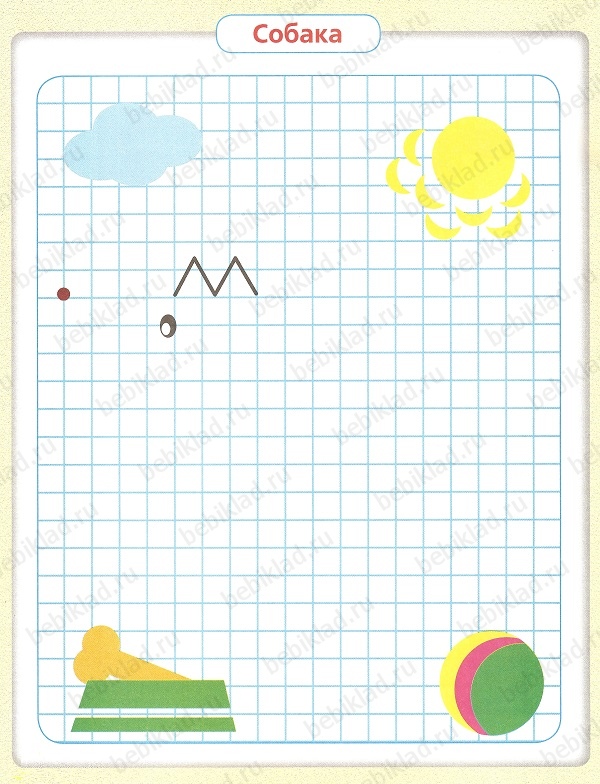
Below are cards with graphic dictations for children in color pictures. In the right column is a sheet that needs to be printed and given to the child. In the left column, opposite the card with a graphic dictation for a child, there is a sheet for an adult. You need to start drawing from the point indicated in the picture. An adult names a number that indicates the number of cells over which a line needs to be drawn and the direction of movement to the right or left (the direction is indicated by arrows). The result should be a drawing with an image similar to the template. Have fun and useful activities!
Artists: E. Belyaeva, E.A. Timofeeva.
Click on the picture and it will open to full size. To save the dictation to your computer, click on the selected picture, then right-click, in the window that opens, select “Save picture as” and specify the folder on your PC where you want to download the dictation.
| Card for graphic dictation (children) | Card for graphic dictation (adults) |
 |
|
 |  |
 |  |
 |  |
 |  |
 |  |
 |  |
 |  |
 |  |
 |  |
 |  |
 |  |
 |  |
 |  |
 |  |
 |  |
 |  |
 |  |
 |  |
 |  |
 |  |
 |  |
 |  |
How to do graphic dictation
(Rules for drawing by cells).
To begin, on the dictation sheet, in the upper corners, put marks - right and left (if the child does not yet know these concepts). This is necessary in order not to confuse the child, so that he remembers which side, where and what is located. Now start completing the task. The sheet contains the complete image that should be obtained in the end. You take this sheet for yourself, give the child a squared notebook sheet, a pencil and an eraser. Below the picture there are arrows pointing to the right, left, up or down. Near the arrows there are numbers indicating how many sticks need to be drawn in one direction or another (how many cells to close in the direction indicated by the arrow). First there is a number, next to it is an arrow indicating the direction.
this means you need to draw a line 2 cells up from the point,
Then 3 cells to the right and 2 cells down.

In the end the drawing will look like this (see picture)
Please note, that the pointers (arrows and numbers) in the tasks (provided on our website) should be read from left to right.
At the top of the picture it is always indicated how many cells need to be retreated from the edge and top to start the dictation. In the indicated place, for example: retreat 9 cells from the edge to the left, count 4 cells from above. In this place you need to put bold point. Help younger children who do not yet know how to count well or count out squares on their own. Set a starting point (from this point the child will draw lines under dictation).
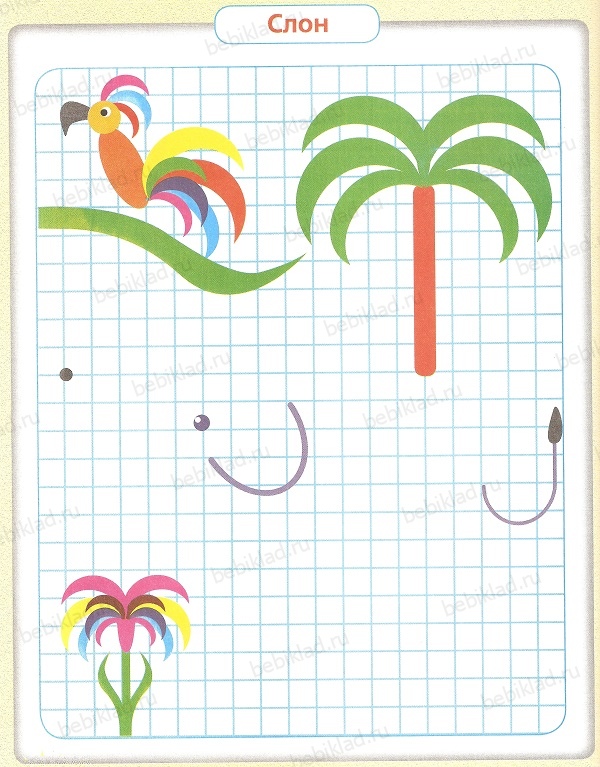
Graphic dictations that can be downloaded for free
Click on the picture and it will increase in size. Right-click and in the window that appears, select the item you need (“print” or “save as”).
 Graphic dictation "Turtle". Drawing by cells.
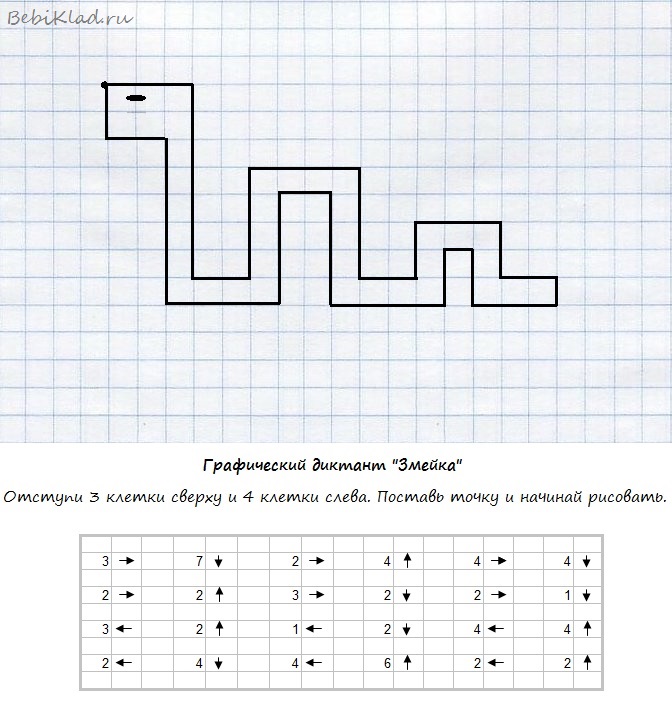 Graphic dictation “Snake”. Drawing by cells.
 Graphic dictation "Squirrel". Drawing by cells.
 Graphic dictation "Camel". Drawing by cells.
 Graphic dictation “Christmas tree”. Drawing by cells.
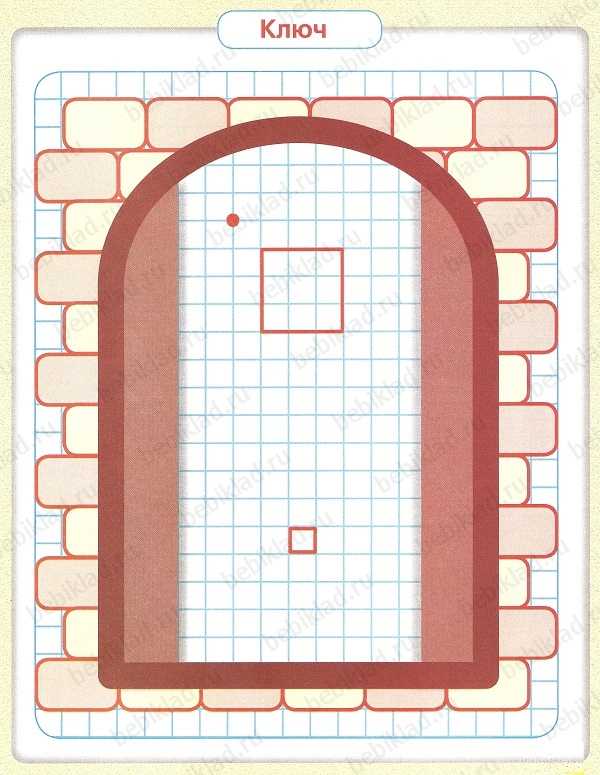
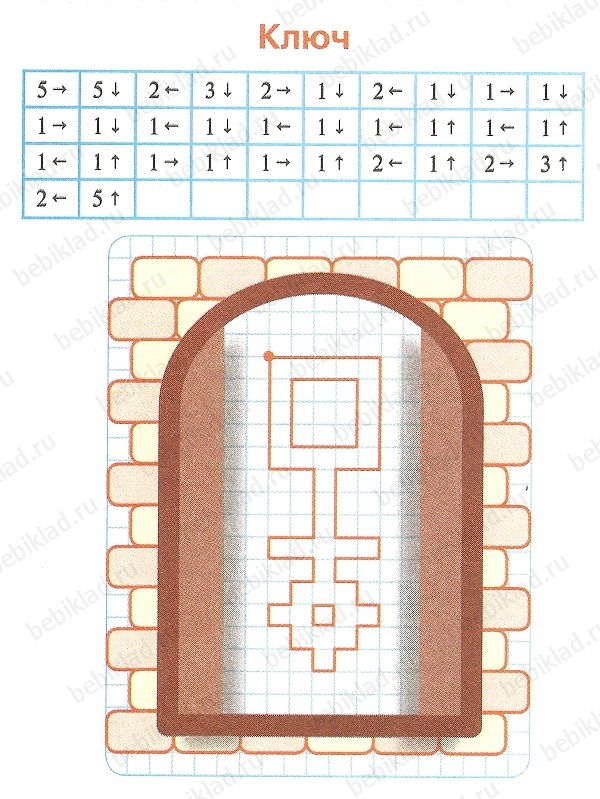
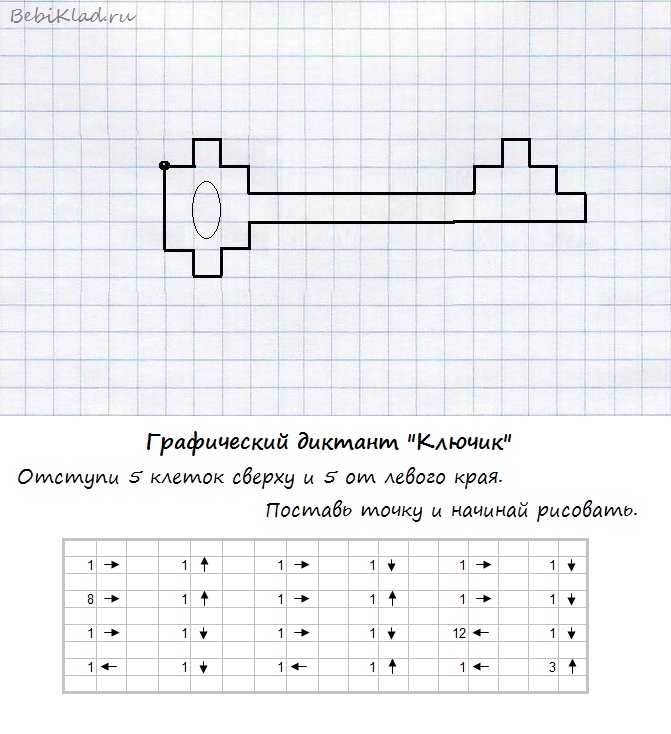 Graphic dictation "Key". Drawing by cells.
 Graphic dictation “Bunny”. Drawing by cells.
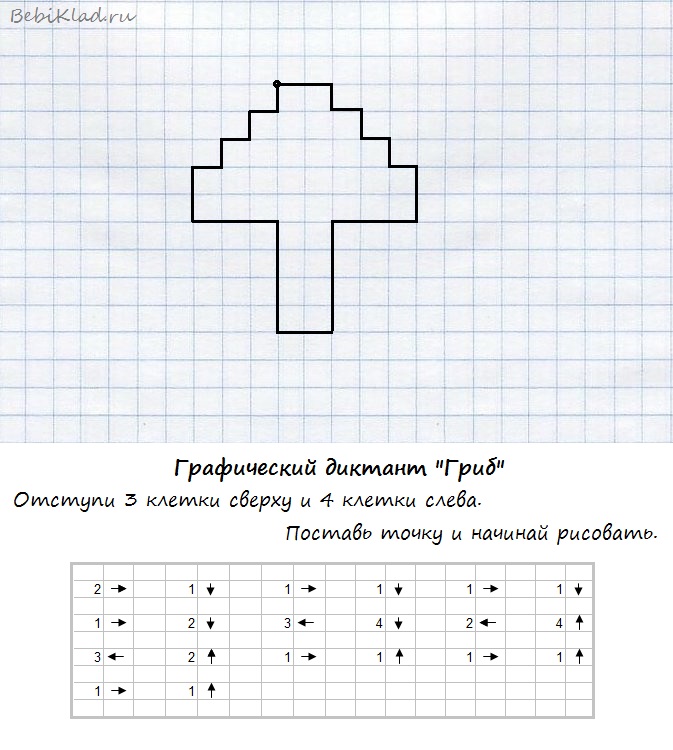 Graphic dictation "Mushroom". Drawing by cells.
 Graphic dictation "Boat". Drawing by cells.
 Graphic dictation “Fish”. Drawing by cells.
 Graphic dictation “Heart”. Drawing by cells.
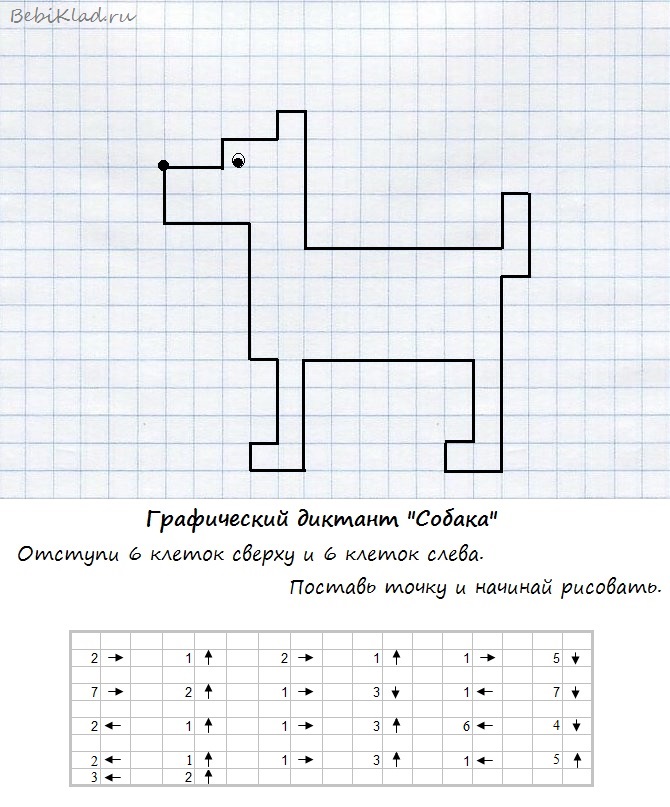 Graphic dictation “Dog”. Drawing by cells.
 Graphic dictation “Sun”. Drawing by cells.
Preparing a child for school is a long and obligatory process. Therefore, psychologists and pediatricians recommend starting a year before first grade, in kindergarten or at home. Because the baby needs to be prepared not only for mental and physical stress, but also moral. In general, how to educate, help to become more diligent, attentive and courageous.
If a child can still be mentally prepared for big changes, through communication with peers in the yard and kindergarten. You can teach your child to be more attentive, develop writing skills, and carefully complete certain tasks with the help of graphic dictations and drawing in cells. Today, this is an incredibly popular activity that has won the hearts of not only preschool children, but also teenagers. This is a way to teach your child to write, develop logic, abstract thinking, perseverance and painstakingness, as well as fine motor skills. With the help of this activity, the child develops coordination, stability and corrects the correctness of his movements, so to speak, “gets a steady hand,” which will undoubtedly help him in school, when writing dictations and notes in a short period of time.
What are graphic dictations? Imagine in front of you a sheet of paper with cells drawn on it. The task contains arrows (showing the direction) and numbers (showing the number of cells that need to be passed in the indicated direction). If you follow the signs accurately and carefully, draw a line in the right direction at the right distance, you get an image - a picture. In other words: graphic dictations are drawing in cells using the pointers in the task.
Such activities are recommended not only for children preschool age, in kindergartens, but for children under 12 years of age. After all, attentiveness and coordination of movements can be developed at an older age. An exciting activity is an entertaining leisure time not only for children, but also for adults. The recommended age for starting to draw graphic dictations is from 4 years. It is at this age that fine motor skills begin to develop, with the help of drawing in cells.
Graphic dictations are used as an educational game in various places: at home, in extracurricular activities, on vacation, at sea, in the country, and even in a summer camp. It is important to interest children, and what will do this better than such an activity. After all, the end result will be an unknown picture, which can then be painted with pencils or felt-tip pens. By explaining this to your child, you don’t have to worry about his interest in this, not so much an activity as a game that develops his imagination.
So let's start execution. First of all, you need to prepare, namely, purchase a collection of graphic dictations. You can get them not only in specialized children's book stores, but also in stationery stores and second-hand bookstores. They can be downloaded for free on some sites on the Internet (for example, on our website), you can also go to paid sites. The choice of such tasks is large; choose based on the age, gender and hobbies of the child. For kids just starting classes, it is best to choose graphic dictations (drawing by cells) with images of bunnies, cats, and dogs. For girls: princesses, flowers. But you can start with simple ones. geometric shapes: squares, triangles, prisms. This way you will immediately teach your child coordination of movements, improve hand motor skills, develop perseverance and attentiveness, and tell him about the names and types of geometric shapes. For boys, dictations with images of cars, animals, robots, castles, and funny people are suitable. The easiest graphic dictations, with simple figures and performed in one color - for beginners. More complex tasks - for older children. Choose graphic dictations on a topic that interests your child. If your child plays music, use drawings musical instruments, treble clefs and sheet music.
If you have already practiced drawing with your child using squares, start adding variety to your activities. That is, at 5-6 years old, you can do dictations that help you develop even more. That is, buy drawings with those animals that the child has not yet seen and does not know what they look like. Use colors that the baby has not yet learned very well. Expand your child’s horizons in this way, let him increase and replenish his vocabulary with new words, teach them, and find out where they can be used. The main thing is good mood, passion and positive attitude of the baby before completing any task. Under such conditions, studying will indeed be incredibly useful, fruitful and not stressful for the child.
After selecting graphic dictations, start preparing. Remember that the child must be praised for a job well done. Even if the picture doesn’t work out yet, you don’t need to constantly prompt, guide and compare with other children. It is necessary to guide and push a little in the right direction. To do this, first of all, you need to teach the child where the left side is and where the right side is. Show where the top and bottom are on the piece of paper. This simple and simple knowledge will help you complete all graphic dictations with 100% accuracy.
Sit near a table with a flat and smooth surface so that the child can sit evenly and correctly in the chair. Pay attention to the lighting. Advice: if you want to accustom your child to a school notebook, give him the opportunity to get used to it, learn to navigate, prepare graphic dictations on a sheet of paper, exactly like a school notebook. Now prepare a simple pencil and an eraser so that incorrect stripes can be easily removed and the same dictation can be continued again. Prepare yourself a pencil and eraser as well.
It is worth keeping an eye on the time so that the child does not get tired, so that his hands and eyes rest. Although if the child is not tired and wants to continue and finish the work now, there is no need to take away the dictation, the child will decide for himself when enough is enough.
There are time limits for working with graphic dictations
For children 5 years of age – maximum 15 minutes. For older children, up to 6 years old – a maximum of 20 minutes (from 15 minutes). For first-graders (6 or 7 years old) – maximum 30 minutes, minimum – 20 minutes.
Drawing by cells – great way teach your baby to use a pencil and pen. Teach how to hold it correctly, practice so that your fingers don’t get so tired from holding an object at school. This exercise will help you teach your child to count correctly, since he will need to count the exact number of cells before starting the lesson.
And so: in front of you lies a graphic dictation task, a pencil. In front of the child is a squared piece of paper or a notebook, an eraser and a simple pencil. On the child’s sheet, with or without your help, a reference point is depicted in the indicated place. Explain that from this point lines begin to be drawn (right, left, down and up), in the direction and with the number of cells that you name. Now proceed, next to the named task, and they are indicated in a line, put a dot with a pencil so as not to forget where you finished the dictation, not to confuse the child and, of course, yourself. Watch what the child is doing. Tell me if the baby is confused about where the left and right sides are. Count together, if necessary, the number of cells.
For example, you have a figure, the most standard one is a house. Tell your child what kind of drawing you will end up with, or keep it a secret for even more interest. From the point you need:
1 → - 1 cell to the right
Dictate clearly; the child must perceive everything by ear. At the end of the work, look at how much the baby’s figures coincide with the given elements. If the baby made a mistake, find out together where exactly. Using an eraser, erase the extra lines, starting from the point of failure, and continue drawing. It is important to maintain the child’s good mood during the learning process.
drawings by cells
Graphic dictation(drawings by cells) helps parents and teachers prepare their children for school. Systematic classes with graphic dictations develop children's attention, imagination, fine motor skills, perseverance, and coordination of movements.
Drawing by cells is a very useful and exciting activity not only for preschool children, but also for older children. This is a playful way to develop spatial imagination. Graphic dictations can be performed for children from 5 years old.
There are two options for conducting graphic dictation:
- The child is given a sample of a geometric design and asked to repeat exactly the same design in a notebook.
- The adult dictates the sequence of actions - names the number of cells and the direction (right, left, up, down), the child does the work by ear, and then compares his work with the model.
For graphic dictation you will need a simple pencil, an eraser, and a squared notebook.
The duration of one lesson should not exceed 10–25 minutes (depending on the age of the child).
I have compiled small dictations for children aged 5 years and older. Start with simple drawings and move on to more complex ones. In some dictations, you need to step down or to the right so that the drawings do not overlap each other or extend beyond the notebook. The beginning of the drawing is marked with a dot.
Graphic dictation No. 1
Graphic dictation No. 2

Graphic dictation No. 3

Graphic dictation No. 4

Graphic dictation No. 5

Graphic dictation No. 6

Graphic dictation No. 7

Graphic dictation No. 8

Graphic dictation No. 9

Graphic dictation No. 10

Graphic dictation No. 11

Graphic dictation No. 12

Graphic dictation No. 13

Graphic dictation No. 14

Graphic dictation No. 15

Graphic dictation No. 16

Graphic dictation No. 17

Graphic dictation No. 18

Graphic dictation No. 19

Also try with your child drawing by cells "".
Go with your child.
Graphic dictations are used in several developmental methods at once. However, the benefits (and joy!) they bring are often underestimated. Meanwhile, this is one of the most useful attention exercises, not only for preschoolers, but also for teenagers!
What is graphic dictation? Essentially, this is just drawing in cells. Listening to the instructions of the teacher or mother, the preschooler marks with a pencil the route dictated by her: two cells to the left, one down, one to the right, three up... Everything seems simple, but in fact this simple activity requires full concentration: you cannot be distracted for a second!

Herringbone
2 up, 6 left, 2 up, 3 right, 1 up, 2 left, 2 up, 3 right, 1up, 2 left, 2 up, 3 right, 1 up, 2 left, 2 up, 3 right, 1 up, 2 left, 2 up, 2 right, 1 up, 1 left, 1 up, 1 right, 1 up, 1 right, 1 down, 1 right, 1 down, 1 left, 1 down, 2 right, 2 down, 2 left , 1 down, 3 right, 2 down, 2 left, 1 down, 3 right, 2 down, 2 left, 1 down, 3 right, 2 down, 2 left, 1 down, 3 right, 2 down, 6 left, 2 down, 1 left.
Why can't you be distracted? Because (and this is the main advantage of graphic dictation) the result is a funny picture: a flower, a house, a man. As soon as the baby sees a drawing in front of him that has appeared as if by magic, he immediately demands: more!
A variation of graphic dictation for the little ones - the “complete the picture” exercise. Offer your child the left half of a symmetrical pattern, for example, our “herringbone”, and offer to complete the right side. To do this, you don’t even need to know the numbers and distinguish between “right” and “left”.
For elementary school students, the task can be dictated (if it is important to practice listening to information), or you can give written instructions, where the direction of pencil movement will be indicated by arrows - also a very useful exercise.

Tulip
1 ←, 8, 1←, 1, 1←, 6, 1→, 2↓, 1→, 2, 1→, 2↓, 1→, 2, 1→, 6↓, 1←, 1↓, 1←, 2↓, 1→, 1, 1→, 1, 1→, 1↓, 1→, 1↓, 1→, 1↓, 1 ←, 1↓, 1 ←, 1↓, 1 ←, 1, 1 ←, 1, 1 ←, 5↓, 1←.
Of course, graphic dictation is useful not only for training attention. Fine motor skills also develop (the smoother the line, the more beautiful the drawing will be), the baby gets acquainted with the concepts of “right”, “left”, “top”, “bottom”, and, of course, the skills of counting within ten are practiced. And it's all in shape exciting game- wonderful, isn't it?

Butterfly
4, 8, 2←, 6, 1→, 2, 6→, 1, 1←, 1,1←, 1,1←, 1, 3←, 2, 1←, 3, 1←, 4, 1→, 1↓, 4→, 1↓, 1→, 1↓, 1→, 1↓, 1→, 3, 1←, 2, 1→, 1, 1←, 1, 1←, 1, 1←, 1, 1←, 1→, 1↓, 1→, 1↓, 1→, 1↓, 1→, 1↓, 1→, 1, 1→, 1, 1→, 1, 1→, 1, 1→, 1←, 1↓, 1←, 1↓, 1←, 1↓, 1←, 1↓, 1→, 2↓, 1←, 3↓, 1→, 1, 1→, 1, 1→, 1, 4→, 1, 1→, 4↓, 1←, 3↓, 1←, 2↓, 3←, 1↓, 1←, 1↓, 1←, 1↓, 1←, 1↓, 1←, 1↓, 6→, 2↓, 1→, 6↓, 2←, 4↓, 1←, 3, 1←, 1, 1←, 1, 1←, 1, 1←, 4↓, 1←, 4, 1←, 1↓, 1←, 1↓, 1←, 1↓, 1←, 3↓, 1←.
When starting to dictate, do not forget to set the starting point - you can mark it on the sheet yourself. The resulting drawing can be used as a coloring book.
For graduates primary school The exercise can be complicated and diversified by giving out a sheet lined in the manner of a battlefield. In this case, the dictation will look like this: “A7-C12; B3-E2...” The drawing in this case can become infinitely more complex, consisting not only of vertical and horizontal, but also diagonal lines.
Don’t be surprised, but graphic dictations are also popular among teenagers. True, these are completely different dictations, using colored pencils and pens, but the result can be real paintings!


Finally, graphic drawing is a good meditative entertainment for adults, no worse than anti-stress coloring books, only much cheaper. You get funny pictures in the Minecraft style - perhaps this is the hobby you will like?
Prepared by Antonina Rybakova
It's easy to draw a Christmas tree yourself. Follow the steps described in the article to create a real New Year's masterpiece.
The favorite holiday of all children and adults is New Year. With the onset of winter, we prepare to welcome him: we buy sparkling decorations for the home, garlands and colorful lanterns.
- The main attribute of this holiday is the Christmas tree.
- Many people fundamentally do not buy live spruce trees for their own reasons, while others want nature to remain untouched for our descendants
- Artificial Christmas trees are expensive, so you need to learn how to draw this evergreen tree to decorate your home and create a New Year's mood in it
- Make your own attribute New Year's holiday simple, you just need to be patient and paint
How to draw a Christmas tree step by step with a pencil?
Prepare a large sheet of paper, because a Christmas tree is a tree and it should be tall. The minimum size of the sheet on which you need to depict the New Year's attribute is A1 format. You can glue several of these sheets together, and then you will get a real masterpiece.
How to draw a Christmas tree step by step with a pencil:

- In the middle of the sheet draw a straight line with a pencil
- At the very top of this line draw a star, as in the picture above. You can draw an even five-pointed star. It all depends on your imagination
- Draw two lines from the star down, but not even, but smoothly diverging to the sides. Connect them with a zigzag stripe
- Below, draw another such detail, which will start from the second zigzag on the right and left sides. It should be slightly larger than the top
- The very last - the third part of the tree, draw even larger in size than the second one. At the very bottom of the New Year's beauty, draw a trunk
- Paint the spruce green: the top part is light, and the second and third are dark shades
- Draw Christmas tree decorations different colors, and a background with snow
Tip: This image of a New Year's attribute can be hung on the wall in the living room or in the children's room. Decorate the picture with tinsel and colorful shiny rain.
Drawing a Christmas tree step by step for children
It is easier to explain to children how to correctly depict a Christmas tree on a notebook sheet with squares. When does a child understand that spruce is several triangles of different sizes, he will be able to draw it on a simple sheet, without cells.
Such drawings in kindergarten are called graphic dictations. They help prepare children 5-7 years old for school. These lessons teach the child to be attentive, listen to the teacher and do what he says.
Advice: Practice with your little one at home using graphic dictations, and it will be easier for your child to study at school.
So, stages of drawing a Christmas tree by cells for children:

Drawing a Christmas tree step by step for children
- Place a notebook sheet in front of your child in a checkered pattern and a pencil or pen
- Tell him to back off 10 cells on the left, 3 cells on top, put a dot and started drawing.
- Now dictate according to the diagram, in columns: 1 cell to the left, 2 cells down, 1 cell to the left, 1 cell down and so on.
- When the child finishes drawing to the bottom of the sheet, draw a symmetry line, and ask the child to draw the same thing, but on the other side, like the image in the mirror.
- The drawing is finished, ask the child: what happened?
Important: This way you can draw different objects and animals. The main thing is to work with your baby in a playful way. For example, while drawing, read a poem about a Christmas tree or sing a song with him.

A child may need to draw a spruce at school or even his parents - at work or at home, especially before the New Year holidays.
Important: The main thing when depicting any object on paper is its schematic drawing in pencil - a sketch. When all the steps in the pencil are completed, you can start painting with paints.
Drawing spruce with a pencil step by step:

- Draw a straight vertical line the same length as the height of the tree.
- Step back a little from the top and draw smoothly curved lines to the sides of the vertical strip - these are blanks for drawing branches.
- Now draw the top of the head, as shown in the figure, and “shaggy paws” or tree branches, outlining each blank line.
- Draw one such “foot” in the middle. You can draw snow or grass on the ground.
- If necessary, paint the tree with paints. That's it - the drawing is ready.
Easy Christmas tree drawings for sketching
If you can’t draw a Christmas tree yourself, then trace the finished drawing, attaching it to the window along with a blank sheet of paper, or draw the Christmas tree in another way on the table.
Tip: Print the finished images on a printer and create your own unique masterpiece.
Easy Christmas tree drawings for sketching:
Miniature spruce in a bucket. Show your imagination and decorate it with paints or markers.

Easy Christmas tree drawings for sketching
Drawing of a large spruce. You can hang many colorful balls and garlands on it.

Easy drawings of a Christmas tree for sketching
Sketches of original Christmas trees that can be enlarged and drawn on a large sheet of paper.

Easy drawings of Christmas trees for copying
Learn to draw at any age. This will always be useful in life. In addition, this activity calms the nervous system and adds positivity to our dull everyday life.


